Learn how to install and configure V2Ray Xray TLS on an Ubuntu VPS. Step-by-step technical guide for opening firewall ports, SSH remote connection via JuiceSSH, and deploying secure VLESS, VMess, and Trojan protocols.
Hello Diden Store readers. Following our previous discussions regarding the fundamental differences between Web Hosting and VPS and how to select VPS providers, we will now proceed to the practical implementation phase. In this tutorial, we will build a standalone V2Ray Xray server utilizing TLS encryption on an Ubuntu operating system. Deploying TLS encryption is a crucial step to mask your tunneling traffic as standard HTTPS web browsing, which ensures connection stability and prevents arbitrary protocol blocking by ISPs.
Part 1: Configuring Port Rules in the Provider Security Group (Firewall)
A common issue encountered by beginners is when a setup script executes successfully in the terminal, but the client application fails to establish a connection. In most cases, this happens because the required server ports remain closed at the provider infrastructure level. Before launching your terminal client, you must access your VPS provider control panel to configure the Inbound Rules.
Navigate to the networking or firewall section of your specific provider dashboard and add new incoming traffic rules with the following technical parameters:
- Protocol Type: Select
TCP. You may also create an identical backup rule specifically forUDPif your chosen backend protocol configuration requires it. - Port Range: Enter port
443, which serves as the global standard port for secure TLS/HTTPS traffic. Additionally, open port80to allow the automated certificate issuance scripts to validate your domain ownership via HTTP. - Action Policy: Select the
ALLOWorACCEPToption. - Source Range: Set this value to the default
0.0.0.0/0so your server can listen to incoming requests from any public IP address globally.
Apply and save the changes within your provider dashboard to ensure these network access rules immediately take effect on your virtual instance.
Part 2: Establishing a Remote SSH Connection Using JuiceSSH on Android
The next phase requires accessing your Ubuntu operating system environment to input command-line instructions. For mobile administration on Android devices, JuiceSSH is widely regarded as the most stable terminal client. To secure your server against brute-force automated attacks, we will use an asymmetric Private Key (such as an ed25519 or .pem file provided during instance creation) rather than standard plaintext passwords.
1. Importing the Private Key Authentication Identity
Follow this exact sequence within the mobile app to register your secure login credentials:
- Launch the JuiceSSH application on your device and tap on the Manage Connections menu item.
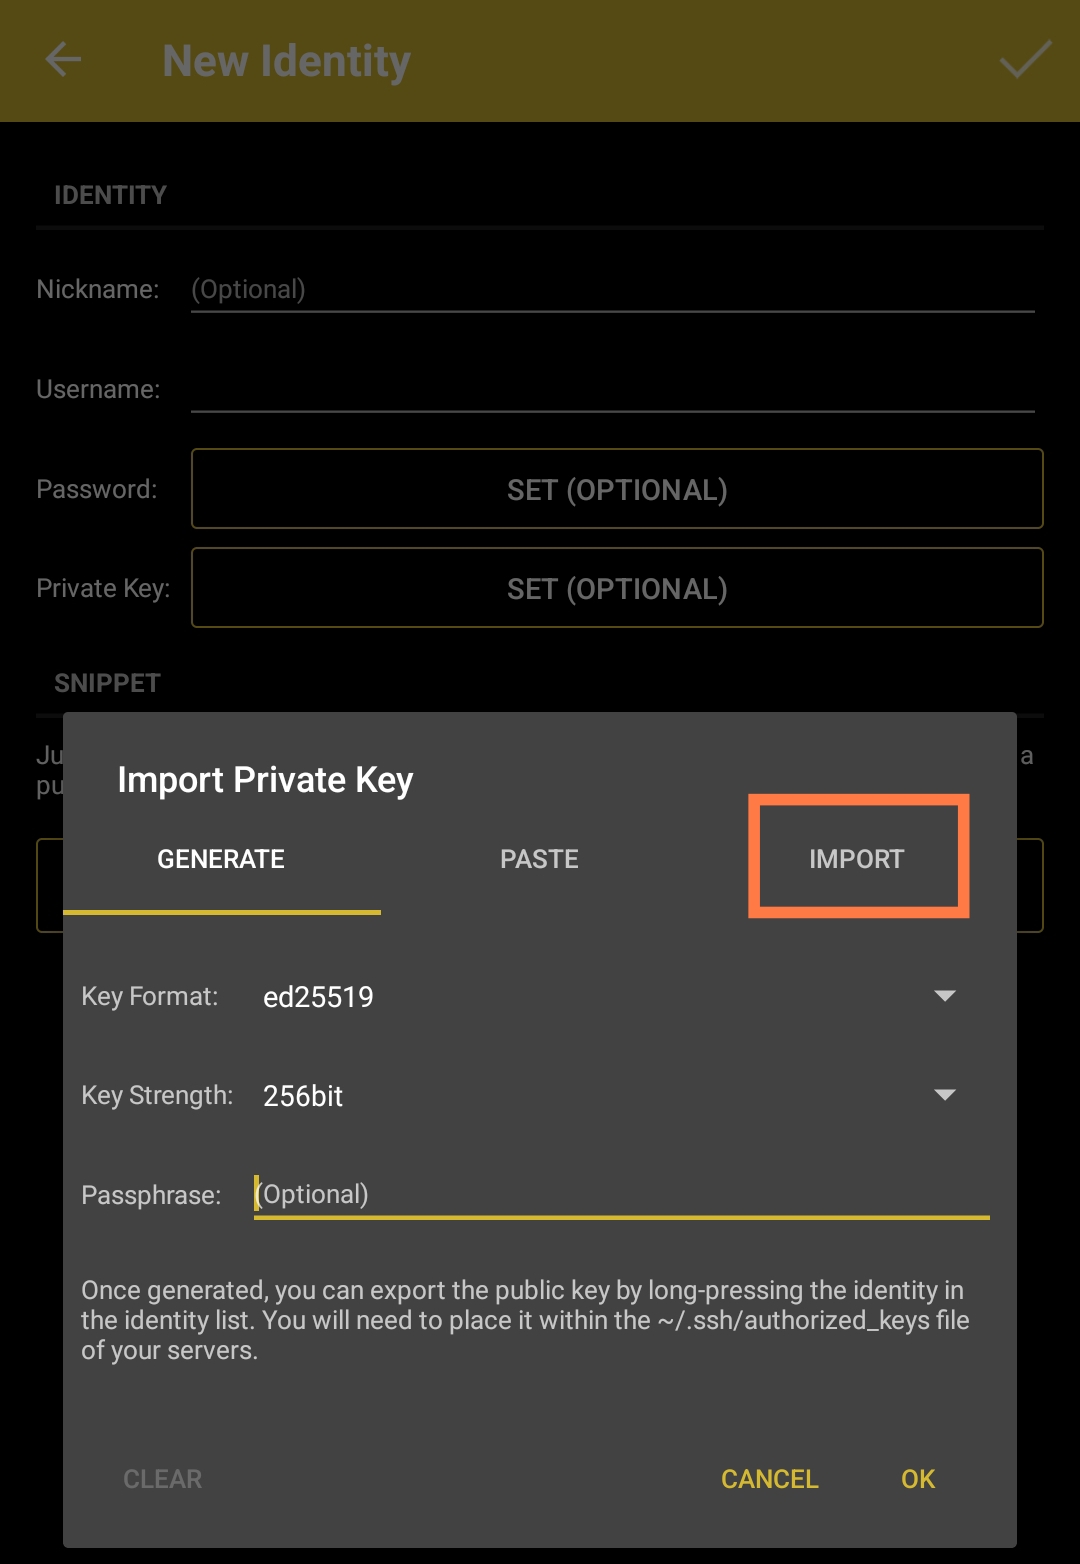
- Swipe across to the Identities tab, then tap the New Identity option located at the bottom of the interface.
- In the Username input field, type
root(the administrative superuser account for Linux distributions). - Locate the Private Key parameter field and tap the SET button to configure your authentication file.
- Select the IMPORT tab in the upper-right pop-up window, navigate to your device storage where the key file is located, select it, and tap OK to save the identity profile.
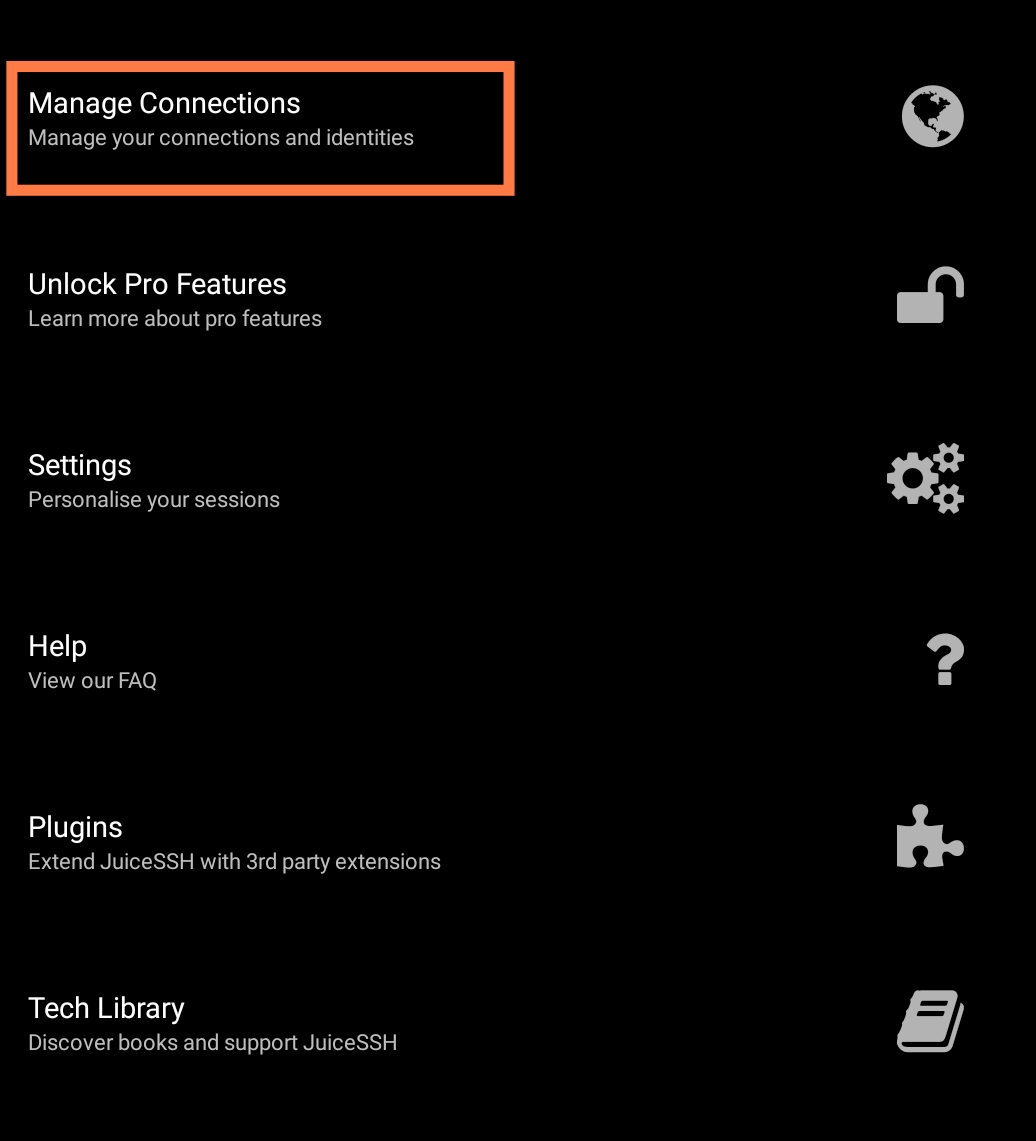
Image: The identity configuration panel used to specify the administrative user credentials.
2. Configuring the Target Host Details
Once your private key identity profile is saved, you need to map it to your server's public network address:
- Return to the Manage Connections menu interface and tap the plus (
+) icon to initialize a New Connection profile. - Nickname: Input any descriptive identifier to easily recognize the instance on your app home screen (Example:
VPS Diden). - Type: Ensure this network parameter is set specifically to the
SSHoption. - Address: Enter the public IPv4 or native IPv6 address assigned to your target Ubuntu virtual private server.
- Identity: Open the drop-down menu selection and choose the root identity containing the cryptographic key file generated during the previous setup step.
- Port: Retain the default Linux SSH listening port, which is
22. - Tap the checkmark icon in the upper-right corner to save your connection configuration.
The configured server host will now be accessible directly from the application home dashboard. Tapping the saved host profile will establish an instant secure terminal session to your remote machine without requiring password entries. Once saved, simply return to the JuiceSSH home screen dashboard and tap on the newly created connection profile to launch your remote terminal session instantly.
Part 3: Selecting and Retrieving the Automated Installer Script from GitHub
When the remote terminal screen successfully displays your command line prompt string (e.g., root@vps:~#), it indicates an active shell environment inside your operating system. The next step involves pulling an automated build script. Within the network administrator community, these installation packages are usually hosted on GitHub and are broadly categorized into two structural models:
- Open-Source Public Scripts: These scripts are free for public use, allowing anyone to fetch and execute them on an unmanaged server without incurring licensing overhead. Common implementations include official deployment scripts from the primary XTLS project repository or alternative open-source wrapper tools. They can be pulled dynamically as long as your instance has outbound internet access.
- Premium Licensed Scripts: Commercial scripts are maintained independently by third-party developers. They feature custom multi-user management control panels, automated bandwidth limiting modules, and native API hooks for Telegram integration. Executing these enterprise scripts requires your specific server public IP address to be pre-authorized or whitelisted in the developer's licensing database prior to system deployment.
The standard operating procedure for pulling a remote installation asset down to an Ubuntu server involves executing the following concatenated commands within your shell window:
apt update && apt install wget curl -y
wget -O install.sh https://raw.githubusercontent.com/YOUR_DEVELOPER_NAME
chmod +x install.sh
./install.sh
Important Technical Note: The GitHub URL provided in the command block above is a generic placeholder utilizing GitHub's official file-hosting subdomain (raw.githubusercontent.com/YOUR_DEVELOPER_NAME). Since installer scripts are dynamically maintained and frequently updated by their respective developers, you must manually replace this placeholder with the actual, verified raw source link from your specific free or premium script provider before running the command in your terminal.
Part 4: Technical Breakdown of the Executed System Commands
An essential aspect of system administration is understanding the underlying system modifications performed by the terminal inputs you run. Avoid running arbitrary copied blocks without validating their functions. Below is an itemized breakdown explaining what each core instruction accomplishes within your Ubuntu environment:
A. sysctl -w net.ipv4.ip_forward=1
This instruction explicitly tells the Linux kernel state engine to toggle IP forwarding on. Changing this runtime parameter value to 1 (active) instructs your operating system to forward data packets arriving from external network endpoints down to alternative networks. This configuration turns your remote server into a functional network gateway capable of routing client proxy tunnels out to the wider public internet.
B. apt update && apt install wget curl socat cron unzip -y
This single line chain updates localized system indexes and resolves the mandatory binary dependencies required before executing the main network core installation routine:
apt updatesynchronizes your local software package index trees against the centralized official distribution mirrors to discover modern package upgrades.wgetandcurlact as the core data transfer command-line utilities used to pipe remote assets down from external servers or GitHub APIs.socatis a versatile networking relay tool required specifically by automated Let's Encrypt validation scripts (such as acme.sh). It temporarily spawns a standalone web listener on local port 80 to verify your domain ownership record.cronlaunches the background system daemon responsible for managing scheduled event execution lists. It runs continuous, automated checks to renew your site SSL certificates automatically every 90 days before expiration.
C. chmod +x install.sh
By default, newly fetched script assets downloaded onto a Linux filesystem lack binary execution permissions as a built-in security measure against malicious writes. Executing the chmod +x instruction shifts the security mode bit of the target file install.sh, making it runnable by the system shell.
Part 5: Deploying and Administering Proxy Accounts (VLESS, VMess, Trojan)
Once your chosen build routine completes its execution, your host server is fully equipped with active Xray binary cores. Contemporary deployment frameworks bundle multiple transport protocols into a single runtime environment, allowing you to deploy three distinct secure protocol architectures concurrently:
- VLESS TLS: A highly optimized modern proxy protocol that operates without state encryption wrappers. By minimizing data processing overhead, it maintains exceptionally low CPU utilization and handles high volumes of concurrent client connections smoothly.
- VMess TLS: The foundational transport protocol of the classic V2Ray ecosystem. It relies on synchronized time-variant client authentication values (UUID tokens) to deliver stable, multi-platform compatibility across various terminal software configurations.
- Trojan TLS: A specialized tunneling method designed to encapsulate proxy payloads inside standard HTTPS web structures. It makes your proxy traffic indistinguishable from typical encrypted website connections, rendering it highly effective against advanced deep-packet inspection network tools.
To initialize proxy client credentials, invoke your software's terminal-based management dashboard by executing its designated shorthand command (commonly menu or xray) within your active JuiceSSH session. From this control script interface, execute the following workflow:
- Select the appropriate management option to add a new client configuration under your preferred transport protocol (VLESS, VMess, or Trojan).
- Provide an isolated, unique username string to map and monitor the corresponding proxy subscriber identity.
- Define the expiration constraints for the credentials. Depending on your backend management capabilities, you can assign short durations like an Account Trial (1 Day) to evaluate real-time regional node performance, or configure extended values like 7 Days or 30 Days (1 Month) for sustained client access plans.
- Upon submitting your configurations, the underlying panel logic automatically prints out a standardized protocol string URI (e.g., beginning with vless://) or generates a responsive terminal QR code.
- Copy the raw configuration string and import it into any compatible v2ray client application that you have to begin routing data across your secure server network.
Disclaimer
The technical documentation published on this blog is intended strictly for instructional, educational, and network administration research purposes. This material aims to clarify Linux server environment configurations, local networking structures, and secure transport layer security (TLS) implementation models. The platform owner does not host or distribute proprietary tools, assumes no liability for the downstream operational activities of third-party virtual private servers, and offers no guarantees regarding service continuity amidst external changes made by Linux distribution maintainers or source code updates released by repository contributors on GitHub. Any associated infrastructural overhead costs or structural maintenance risks are borne entirely by the implementing individual.